How to Import Entourage Mailbox in Outlook 2011 Mac
‘Microsoft Entourage, being the email client cum personal information manager for Mac OS version 8.5 or later, served the consumers across the world for a long time. Entourage ruled the world of email clients ever since its emergence (i.e. in October 2000) to the day when Microsoft completely replaced with Outlook for Mac 2011 in Office for Mac 2011 suite.’
Ever since Outlook for Mac 2011 settled its feet on to the emailing services era, it has been drawing more and more consumers towards itself. Some of the consumers migrated their mailboxes from the current client to the newer platform. Most of the users did not, might be because they are unaware of a reliable way to migrate the mailbox from Entourage to Outlook. The other reason could be that they are over conscious about the security of the mailbox during migration, for which they never attempted it.
In this post, you will get to know about a secure and reliable method to migrate from Entourage to MS Outlook for Mac 2011.
Entourage Mailbox
Microsoft Entourage stored mailbox contents in a .RGE file. In other words, Microsoft Entourage mailbox database file has .RGE file format, which requires the Entourage client for read and write access. A .RGE database file stores emails, contacts, calendar, notes, tasks, and more, which is unique for each mailbox associated with the client.
The file menu in Entourage was provided with Import and Export options, used for tasks like mailbox import and export. The biggest advantage of such data files is that they are easy to transport, and they can be directly imported into Entourage when received at the destination.
Migration from Entourage to Outlook
In addition to a security and reliability during migration, another key issue is the security and reliability of the newer platform itself for your existing well as future emails. However, when it comes to choose Microsoft’s services and products, you can undoubtedly upgrade to them. For the time being, let us go through the below mentioned secure and reliable way to migrate Entourage mailbox to Outlook 2011 for Macintosh.
Locate the Entourage database (*.RGE) file and copy it, and then paste it to another location on the same computer. In case your Mac denies copying the database, you have to export mailbox to a new .RGE file, and then you can proceed with the migration process. See how you can export Entourage data into a .RGE file:
- Launch Entourage and click the File menu, and then choose Export in the context menu
- Select the items that you want to export and click the Next button
- Select No option to leave the items in the Entourage mailbox after export
- Choose a location on your Mac and please check the file extension to save
- Click the Done button to finish exporting the Entourage database.
With this, you now have available a copy of your Entourage mailbox, which you need to import into Outlook 2011 for Mac. Follow the steps mentioned below for this:
- Go to Application > Microsoft Office 2011 > Microsoft Outlook
- Click the File menu and choose Import
- In the Import wizard, select the option ‘Entourage information from an archive or earlier version‘, and then click the Next button to proceed
- On the next screen, select ‘Entourage 2008 (Including Web Services Edition)’ and click the Next button
- All the mailbox items are shown selected by default; click the Next button to proceed
- On the next screen, Select the identity created most recently and click the Next button
- On the following message dialog, click OK
- This will import your mailbox data from Exchange Server and you will see the following screen saying ‘Microsoft Outlook wants to use your confidential information stored in “Exchange” in your key chain’. Click the Always Allow button
- With this, you are done importing the .RGE file into Outlook 2011. You see the following screen and click the Finish button to close it
You can now read/write access your Entourage mailbox in Outlook for Mac 2011 client, and you do not have to modify the file format of any of the mailbox contents.
Set up Your Email Account in Outlook for Mac 2011
Since MS Outlook support synchronizing multiple email accounts simultaneously, you can set up your personal and professional emails simultaneously in Outlook for Mac 2011. See how you can do it:
- In Outlook for Mac 2011, click Tools menu and choose Accounts
- On the Accounts wizard, click the plus (+) button in the bottom left corner and choose Email in the list
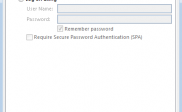
- In the next step ‘Enter your account information’, type in your Email and Password
- Now, you see the windows has been expanded and you need to provide more information:
- In the Email address field, type-in the email address that you want to configure
- In the Password field, type-in the password
- In the User name field, type-in your email ID (the same as entered in step a)
- In the Type menu, choose IMAP
- In the ‘Incoming Server field’, type-in ‘imap.one.com’
- Check the ‘use SSL to connect (recommended)’ checkbox
- In the ‘Incoming server port’ field, type-in 993
- In the ‘Outgoing server field’, type-in send.one.com and port no. 465
- Check both ‘Override default port’ and ‘Use SSL to connect (recommended)’ check boxes, and then click the Add Account button
- In the next step, prove the following information associated with your email account being set up:
- In the Account description field, type-in your email
- Provide rest of the information as in step 4
- Click More Options button and select an authentication mode
- Provide your Username and Password
- In the Unqualified domain field, type-in the domain name used in your email ID
(Email ID: username@exampledomain.com, then domain name: exampledomain.com)
- Click OK
With this, you end up configuring your email account on Outlook of Mac 2011. Your Emails should start downloading automatically.
About Author
Admin
Blog author is a reputed system administrator in a big IT organization. Having 10+ years of experience in different technologies including, Office Systems, Exchange Server, Mac Technology, and Open Source email server platform. Ask him the query when you stuck in critical issue.
